Move Copy Rotate in AutoCAD
- LESSON 1-1X-Y CO-ORDINATE SYSTEM, INPUTTING POINTS, AUTOCAD SCREEN, BASIC TERMINOLOGY
- LESSON 1-2ASSIGNMENT 1 INTRO TO DRAWING / MODIFYING COMMANDS
- LESSON 1-3MORE MODIFYING COMMANDS / OBJECT SNAPS (TRIM EXTEND OFFSET)
- LESSON 1-4ASSIGNMENT 3 ACCURATE INPUT
- LESSON 1-5SELECTION SETS
- LESSON 1-6ASSIGNMENT 4 MODIFYING COMMANDS (MOVE COPY STRETCH MIRROR)
- LESSON 1-7ASSIGNMENT 5 MODIFYING COMMANDS (ROTATE FILLET CHAMFER ARRAY)
- LESSON 1-8ASSIGNMENT 6 (LAYERS DIMENSIONS TEXT SCALE)
- LESSON 1-9DIRECT DISTANCE ENTRY AND OBJECT TRACKING
- LESSON 1-10CHANGING THE PROPERTIES OF OBJECTS
- LESSON 1-11ZOOMING AND PANNING AROUND A DRAWING
- LESSON 1-12ORTHOGRAPHIC PROJECTION
- LESSON 1-13SECTION VIEWS
- QUIZ FOR LEVEL 1 - 46 QUESTIONS
Topics covered in this Lesson:
Move, Copy, Stretch, Mirror
In this assignment you will be adding some more common commands to your collection. All of these commands are ones that you will use on a regular basis.
| Command | Keystroke | Icon | Location | Result |
|---|---|---|---|---|
| Move | Move / M | Home > Modify > Move | Moves an object or objects | |
| Copy | Copy / CP | Home > Modify > Copy | Copies object(s) once or multiple times | |
| Stretch | Stretch / S | Home > Modify > Stretch | Stretches an object after you have selected a portion of it | |
| Mirror | Mirror / MI | Home > Modify > Mirror | Creates a mirror image of an object or selection set |
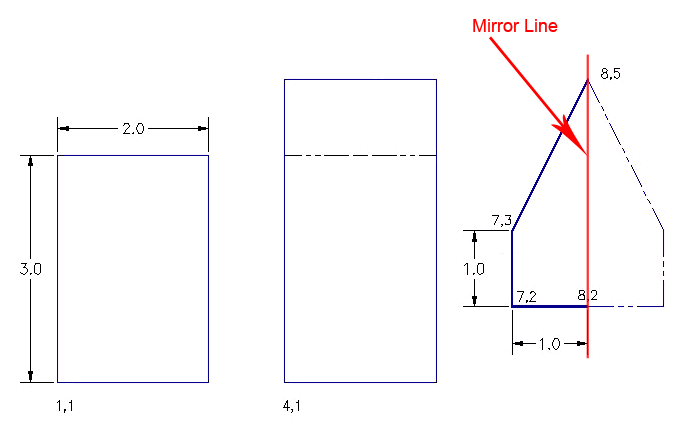
In this is a short assignment to show you how these commands are used. You will recreate the drawing called Assignment #4.
Click HERE to see the file
in GIF format.
Click HERE to download the
DWG file.
Start up AutoCAD and set up your drawing as you have in the previous assignments.
Turn on
your Endpoint Osnap
This time draw the border first. Draw a 10" wide by 7" high rectangular border using any method. The bottom left corner must be at 0,0
Draw a 2 wide by 3 high rectangle using the RECTANGLE command. The bottom left corner must be
at 0,0.
Notice that the small rectangle and the border are overlapping each other at the bottom left
of your drawing. What you want to do is move the small rectangle right 1 unit and up 1 unit
so that it is away from the border.
To do this, start the MOVE command by typing in either M or MOVE <ENTER>. Select all
the lines of the rectangle using one of the selection methods described earlier. Press
<ENTER>. Now AutoCAD asks for a "base point or displacement". What it is needing is a
reference point. Click on the bottom left corner of the rectangle. AutoCAD now asks for a
'second point of displacement'. What it needs to know now is how far you want to move it.
This is a great time to use relative
coordinates. In this case, you want to move it 1" over and 1" up. So
type @1,1 <ENTER> to achieve this. The rectangle will automatically move to its new
location.
Now you want to copy this rectangle 3" over to the right. The copy
command is very similar to the move command. (The only difference is that the copy command
leaves an original behind.)
Command: M MOVE
Select objects: <Select the Rectangle> 1 found
Select objects: <Press ENTER to finish selecting objects>
Specify base point or [Displacement] <Displacement>: <Pick on corner>
Specify second point or <use first point as displacement>: @1,1 <ENTER>
Start the COPY command. You will be asked to select objects. Select the rectangle you just moved. AutoCAD now needs the "base point or displacement" just like in the move command. Once again, select the bottom left corner of the rectangle. Once you've done this, you need to tell AutoCAD what the second point of displacement is. Since you want to move the rectangle over 3" to the right, type in @3,0 <ENTER> The rectangle has now been copied 3" over.
Command: C COPY
Select objects: <Select the Rectangle> 1 found
Select objects: <Press ENTER to finish selecting objects>
Current settings: Copy mode = Multiple
Specify base point or [Displacement/mOde] <Displacement>: <Pick on corner>
Specify displacement <-25'-10 5/16", 11'-11 3/16", 0'-0">: @3,0 <ENTER>
BREAK TIME : Copy and move are 2 commands that you use a lot with AutoCAD. Both commands work the same way in terms of the steps you take. Learn to use these commands well - you'll need them. Honestly. Being quick with these commands makes you a much better drafter.
But the rectangle is not as tall as the one in the sample drawing, the sample drawing's rectangle is 1 unit taller. To modify this, you'll use the stretch command.
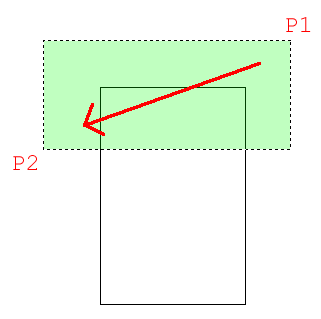
Start the STRETCH command by typing S <ENTER>. AutoCAD now makes you select objects by using a crossing window or crossing polygon. You're going to use a crossing selection. Remember from the Lesson 1-5 that you make a crossing selection by creating it from the right to left. Left-click just a bit above and to the right of the top right hand corner of the new rectangle (P1). Move your crosshairs down and to the left until your (dotted) crossing window covers the top half of the rectangle completely and then left click again (P2). You'll see that the objects are highlighted now. Press <ENTER> to accept this. Next you're asked for that now familiar base point. Pick on the top left corner of the rectangle. Now give AutoCAD the second point of displacement. In this case, you want to stretch the rectangle 1" up, so type @0,1 <ENTER> to do this. The rectangle is now 1" taller.

Command: S STRETCH
Select objects to stretch by crossing-window or crossing-polygon...
Select objects: Specify opposite corner: <Select top of Rectangle with a crossing window> 1 found
Select objects: <ENTER>
Specify base point or [Displacement] <Displacement>: <Pick on corner>
Specify second point or <use first point as displacement>: @0,1 <ENTER>
The goal when selecting objects to stretch is to draw the window over the vertices or points that you want to stretch. If you miss a corner, you will change the shape of the rectangle. So always be aware of which points need to be stretched. In this example, it was pretty obvious, in more complex drawings - it won't be.
Next you want to draw the polygon on the right side. To do this, you will draw the three lines on the left side first and then mirror those lines over to the right side. Draw the 3 lines any way you like (hint: use absolute coordinates).
Once they are drawn, begin the MIRROR command. Select the three lines (press <ENTER>) Now you are asked for the first point of the mirror line. With your endpoint Osnap turned on, pick the end of the line at 8,2. Now you are asked for the second point. Select the point on the line at 8,5. Once you've done this, AutoCAD wants to know if you want to delete the old objects. In this case you don't, so accept the default by pressing <ENTER>. The mirror line will be half-way between the object the you are mirroring and where you want it to be. Figuring out where the mirror line is the toughest part of this command.

Command: MI MIRROR
Select objects: <SELECT THE 3 LINES> Specify opposite corner: 3 found
Select objects: <ENTER>
Specify first point of mirror line: <SELECT 8,5>
Specify second point of mirror line: <SELECT 8,2>
Erase source objects? [Yes/No]: <ENTER>
The assignment is now complete. Review what you have done and practice on these commands. Save and print your assignment. Copy and Move are very common commands. For example, you might create a ceiling light, then have to move it into place, and then copy it to other rooms. Fortunately, these commands work very similar, and once you master one, you have mastered both.
Save the drawing files as Assignment-4.dwg
Video: Assignment 4
Extra Practice: Copy this drawing using the commands you have learned in lessons up to this point - extra_007.gif
Video: Exercise 7
Extra Practice: This exercise uses an option of the CIRCLE command called "Tangent Tangent Radius" or TTR. To use it, pick the two tangents of the circle first, then enter the radius. The rest of it uses previous commands. extra_008.gif This one is tricky, so try it a few times before checking the video.
Video: Exercise 8
You Scored:

Fun fact: From less than $15,000 in revenues in 1983, Autodesk's sales exploded to over $1 million and the company had a profit of over $100,000. With 1,000 copies of AutoCAD sold by the end of the year.

- To cover this months server costs
- Exceeding amounts will go to creating new content
- Even a penny will help
Did you like the lesson? ❤️
