Layout, Viewports and Plotting
- Lesson 2-1PLANNING A PROJECT - OFFICE FLOOR PLAN
- Lesson 2-2INTRODUCTION TO BLOCKS - CREATING AND INSERTING (DYNAMIC BLOCKS)
- Lesson 2-3ALIGN AND ROTATE COMMANDS
- Lesson 2-4ATTRIBUTES - NON-GRAPHICAL INFORMATION
- Lesson 2-5HATCHING - FILLING AREAS
- Lesson 2-6WORKING WITH TEXT
- Lesson 2-7POLYLINES
- Lesson 2-8LAYOUT TABS - PLOTTING AND PAPER SPACE
- Lesson 2-9PARAMETRIC CONSTRAINTS
- Lesson 2-10ELEVATION DRAWINGS
- QUIZ FOR LEVEL 2 - 47 QUESTIONS
Topics covered in this Lesson:
Layout Tabs, Printing Layout, Rotating your View, Freeze/Thaw Layers
In Level 1 you printed out your project using 'model space'. This lesson will show you the preferred way of plotting your drawings.
In AutoCAD there are two different workspaces: model space and Layout / Paper Space. Think of model space where you make your model, or draw. Think of the Layout Tabs as where you layout the prints of your drawing or layout the final drawing complete with dimensions, notes, title block, etc. Look at the images below to see a visual explanation of the concept.
Note about the terminology in this Lesson:
After AutoCAD R14, the term
"Paper Space" was replaced by "Layout". These terms are interchangeable. The release of
AutoCAD 2000 brought other enhancements to
this functionality. You can now have multiple layouts, you can name them, you can
re-sequence them and more. I'm going to use the term paper space as I feel it explains the
process better. (Plus I'm old and set in my ways!)
What is a Layout?
A layout is a page that allows you to set up a plot
or printout of your drawing. Below is a sample of what a layout looks like (a really simple
one).
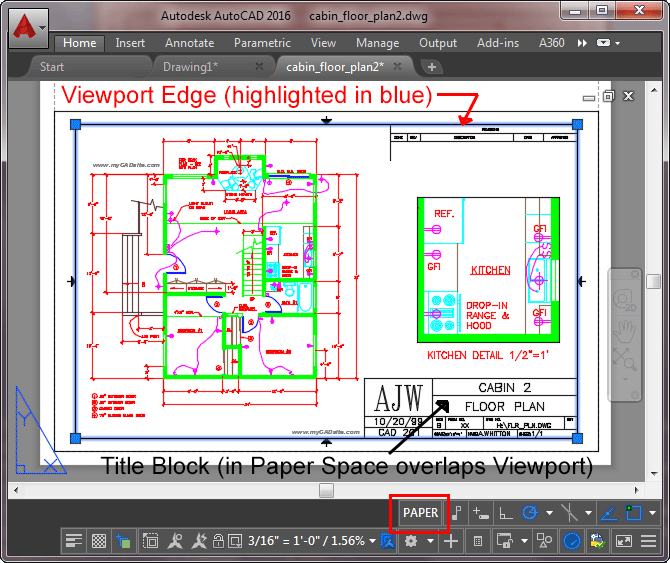
The floor plan and dimensions (above) were created in MODEL SPACE at a 1:1 scale. The walls
were drawn to be 30' or more long.
The title block and viewport were created in a LAYOUT TAB / PAPER SPACE at a 1:1 scale.
The title block is 8-1/2 x 11 inches.
The viewport is a window into "model space". In the image below, the viewport is the heavy blue rectangle and the contents of the viewport are displayed inside it (shown as grey for this example). The contents of the viewport are scaled to either fit the viewport or (preferably) to conform to a specific drafting scale (i.e.: 1"=1')
Below is a visual representation of a layout for a print to be plotted from a Layout tab.
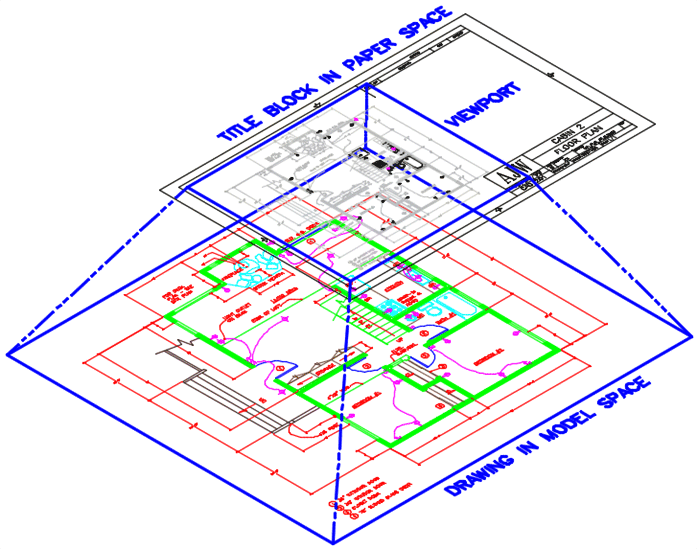
This conceptual image shows the relationship between model space and a Layout.
Think of paper space as being 'above' model space. To see through 'into' model space, you have to create a viewport (Make Viewport MV command). Think of a viewport as a window. As soon as you create the viewport, the window is closed and the extents of your drawing are displayed. You can see through it, but you can not 'touch' anything in model space.
To have access to your objects in model space from paper space, you have to enter the viewport by typing MS <ENTER>. This 'opens the window' for access. Type in PS <ENTER> to 'close the window'.
You may be wondering why you shouldn't just plot from model space. You can, and many people do, but the advantage of plotting from paper space is that you can have many layouts from one drawing. You can even add detail views without having to copy and scale your geometry. This feature was radically changed in AutoCAD 2000 and is much more versatile. You now have multiple tabs to organize your plots (or 'sheets'). As a rule, unless you're working for a behind-the-times company with a confused CAD Manager, use Layouts.
To toggle between the two spaces, you can pick on one of the layout tabs and back to the Model tab. You can also enter the command TILEMODE and set it to 0 for paper space and 1 for model space. When you do this, you will notice that the UCS icon in the bottom left corner changed to a triangular icon. This new icon confirms that you are paper space.
Model Space (UCS) >>
Layout Tab (Paper Space) >>
When you are in paper space you can draw or insert a title block. In paper space you are still drawing at a 1:1 scale.
Before we go further, there is a setting that I want you to make. This will make your life a lot easier as we work through Layouts and when you are creating your own. For some reason, AutoCAD 'hides' the layout tabs from the screen. We need to turn them on, so this is how you do it. Type in OP (for options) and go to the Display tab of the dialog box. Check the box shown below for "Display Layout and Model Tabs". Press OK.
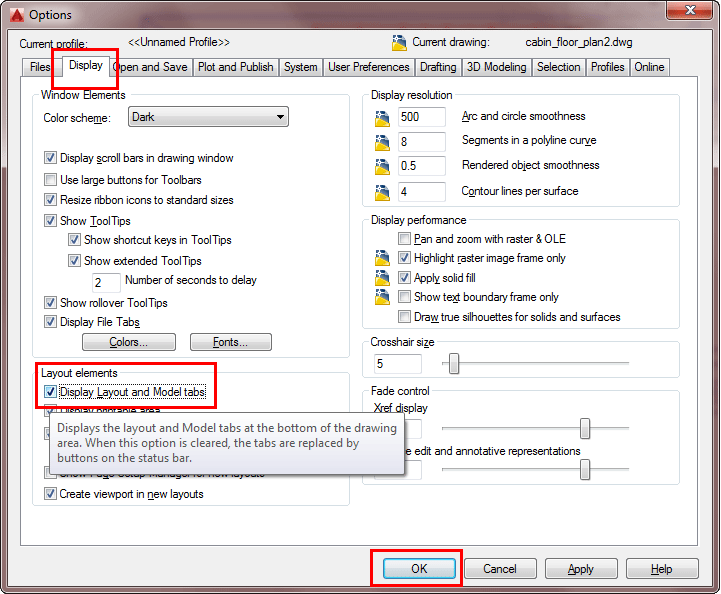
After you press OK - you'll see that new tabs have shown up on the bottom of your AutoCAD screen:

Start this exercise by drawing a simple title block in the tab called Layout 1. Make sure you draw it at 1:1 scale. Start with an 8-1/2"x11" rectangle and make sure it overlaps the edge of the 'virtual' sheet you see. Offset it .375 inside and erase the outer rectangle. Make a couple of small rectangles for the text and add some text as shown below. This ensures that all of your title block will be printed as many printers do not print to the edge of the paper.
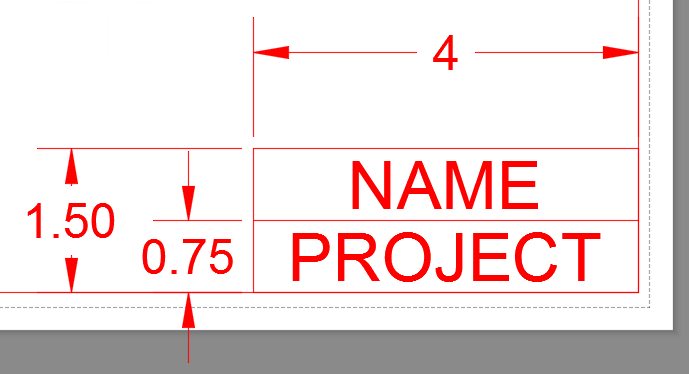
Once your title block is drawn, you can create a floating viewport . This is a 'window' into your model space. To create a viewport, type in MV (for Make Viewport) and then pick two points just as if you are drawing a rectangle. Use as much of your title block as possible.
As soon as your viewport is created, you will see all that you have drawn in model space appear to the extents of the viewport. The next thing you need to do is to scale your viewport for accurate plotting.
To do this, you have to 'enter' your viewport. Do this by either typing MS (for model space) or clicking on the square labeled PAPER (it will switch to Model) on the status bar. In newer versions of AutoCAD like 2005 you can also double-click in the viewport. You will notice that the familiar WCS icon appears in the bottom left corner of the viewport. If you have more than one viewport on the screen, left-click in the one that you want to scale or type CTRL+R to toggle through them to the one you want. To scale a viewport, you just use the ZOOM command. Type in Z <ENTER>
At the command prompt, you must tell AutoCAD what scale you want the viewport to be. This coincides with the scale that you will plot at.
IMPERIAL SCALES
| Plot Scale | Enter: |
|---|---|
| ¼" = 1' | 1/48XP |
| ¾" = 1' | 3/48XP |
| ½" = 1' | 1/24XP |
METRIC SCALES
| Plot Scale | Enter: |
|---|---|
| 1:10 | 1/10XP |
| 1:20 | 1/20XP |
| 1:50 | 1/50XP |
The table above gives you some sample scales. Take ¼" = 1' for example. First remember that 1'=12". If you cross-multiply the 12 by the 4, you get 48. Therefore this scale will be at a 1:48 scale (ratio), or in other terms, your model will be 1/48th the size of real life on paper. To get AutoCAD to scale the viewport, you must type in Z <ENTER>, 1/48XP <ENTER>. This means 1/48th times (X) in relation to paper space (P).
Figuring out what scale you require takes some calculation (unless you are told which scale
to use). You can see what your extents in model space are and then see what your viewport
size is. You can also use trial and error to see what fits in your viewport.
This can sometimes be quicker than calculating.
To sum this up, here are the basic steps required for using paper space layouts:
Finish your drawing (with dimensions) in model space.
Change to paper space. TILEMODE to 0 or click on the Layout tab
Add a title block.
Create a viewport using the MVIEW (MV) command.
Enter your viewport by typing MS (or double-click in the viewport)
Zoom in using a specific ratio by typing in Z <ENTER> ___/___XP <ENTER>
Leave your viewport by typing PS (or double-click outside the viewport) and return to paper space.
One thing that is very important to remember is that you should use paper space only for
plotting. Do not modify your model in paper space. One reason for this is that you could
have layers turned off in your viewport that are related to the objects you
are modifying in the viewport. Return to true model space for any editing that you need to
do. Also, do not draw objects on the Layout screen that are part of the drawing.
To practice this concept, open up one of the drawings you did in Lesson 2-1.
Change to paper space. Draw or insert a title block. If you do not have one, you can find a good 11x17 (B size) title block in your AutoCAD support folder (filename: ANSI_B.DWG). Maybe you drew one in this tutorial ? Insert this and then create a viewport. Enter your viewport and scale as explained above. Return to paper space and print using the settings, EXTENTS / SCALE: 1=1.
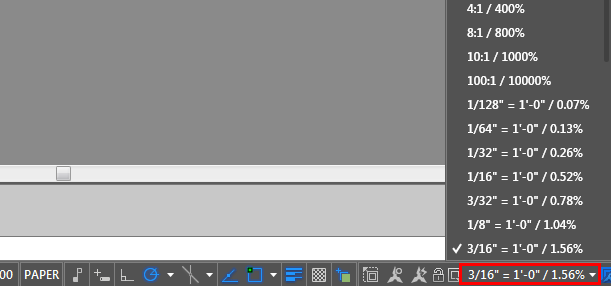
Alternately, when you have a viewport selected or active, you will see a list of scale options at the bottom of the screen to define the scale. Select the viewport, and then select the scale from menu:
Printing from a Layout Tab
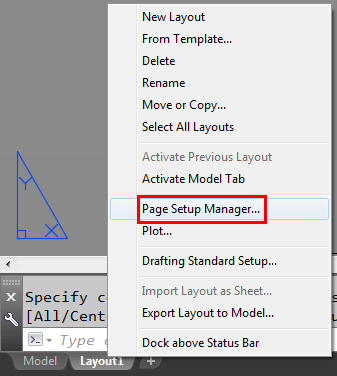
Now that you have a layout of your drawing scaled, you can start to print it. The first thing you need to do is right-click on the layout tab and select "Page Setup Manage" as shown below
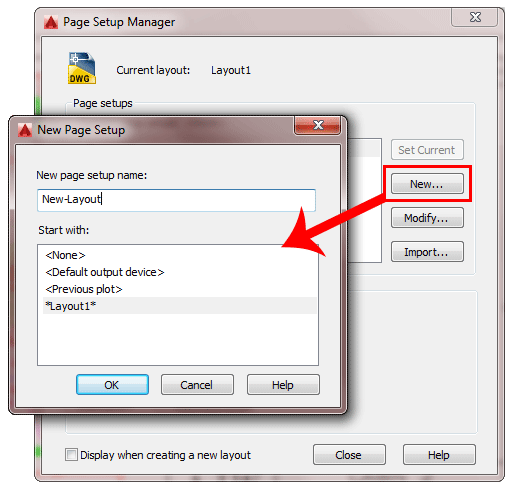
This is where you will select your printer and other parameters required for printing from the layout tab. Press the "New" button and give your new Page Setup a name and press OK:
In the "Page Setup" dialog box, there are a few settings that you will need to make.
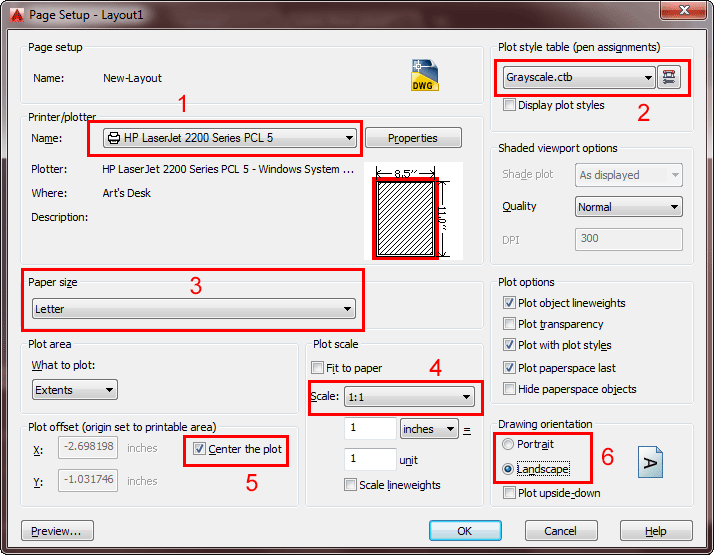
- Select your printer from the list
- Select the Plotstyle (colors) - I have a B&W laser printer, so I have selected Greyscale.ctb. If you have a color printer, try this or select acad.ctb.
- Select your paper size (usually 'Letter' for most home printers).
- Set your scale to 1:1 - remember why we're using layouts
- Center the plot - it just looks better.
- Check the radio button for either portrait (vertical) or landscape (horizontal).
- Press OK to close the dialog box and save your settings.
Back in the Page Setup Manager, select the Set Current button to apply your new settings to the layout and then press the Close button.
Now you are ready to print your layout. Press CTRL+P or type PLOT to bring up the plot dialog box. You should see all of the settings that you just entered. Click the Preview button to see how your plot will look. If it looks like it should, you can now plot. If you need to make changes, press Escape and make the needed changes.
Rotating your view in a Layout
There are sometimes when the view that you need in a layout is not orientated the way that you want it. for example, elevation drawings are often drawn in place and projected from the original drawing like this:
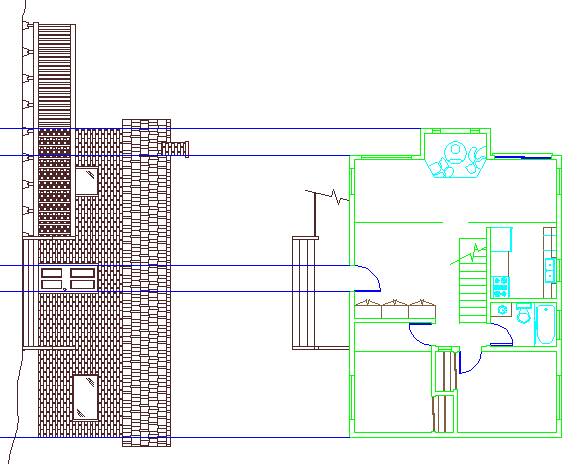
This is fine for model space, but it's not how you want to present it in your printouts. Luckily for you, AutoCAD has an easy way of fixing this.
Download the file Floorplan-with-elevation.dwg and open it up in AutoCAD. It should look just like the image above.Go into a Layout tab and create a new viewport or use the one that is there. Double-click to enter the viewport and type in DVIEW. This will give you the prompt to select the objects. You can select all of the elevation objects, (or just select a few if you have a slower computer.)
Command: DVIEW <ENTER>
Select objects or <use DVIEWBLOCK>: <SELECT THE ELEVATION OBJECTS specify opposite corner: 5 found
Select objects or <use DVIEWBLOCK>:<ENTER>
Now that you have your objects selected, you will see quite few options, but we're only interested in one right now. Type TW for TWist.
Enter option
[CAmera/TArget/Distance/POints/PAn/Zoom/TWist/CLip/Hide/Off/Undo]: TW
Now now enter the 'twist' angle that you need (think of this as the rotation angle).
Specify view twist angle <0.00>: 90 <ENTER>
Enter option
[CAmera/TArget/Distance/POints/PAn/Zoom/TWist/CLip/Hide/Off/Undo]: <ENTER>
Regenerating model.
Now that you have completed the DVIEW command, your elevation should be at
the correct viewing angle. If you have other drawings, you will need to enter different
angles depending upon their original rotation.
Now you can freeze the unneeded layers in the viewport. Also check in model to space to find
that you have not changed anything there.
The DVIEW command is also a lot in 3D work to obtain perspective and natural views.
Top 10 Viewport Tips:
- You can create new layout tabs by right-clicking on an existing tabs and choosing New Layout.
- You can rename a tab by right-clicking and choosing rename.
- You can create viewports of various shapes by creating the object and then using the MV command with the Object option.
- You can also choose to dimension in the Layout. This can be very convenient in AutoCAD 2005. Your dimscale is 1 and all your dimensions are consistent. Try this out on a sample drawing. AutoCAD will scale the dimension to size of the object in the viewport. But you will need to change the DIMLFAC variable first. For example, if your viewport is 3/16 - change it (16/3)X12 - or 64 if you are using imperial measurements.
- You can resize viewports with regular modifying commands and grips.
- Put viewports on the layer called DEFPOINTS (created by dimensions) and they won't plot or put them on a separate layer with the plot option turned off.
- To quickly find the zoom factor of your viewport, use the LIST command on it.
- You can lock and unlock viewports by using the MV > L option.
- You can freeze (turn off) layers in any viewport. (See below)
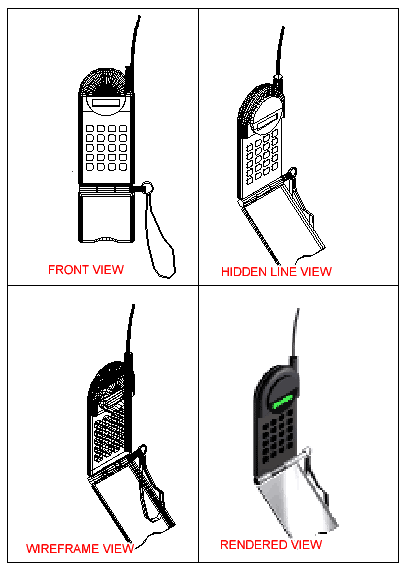
- You can now have your viewports plot for 3D drawings as wireframe, hidden line and rendered views when you plot - this is great! (See below)
Freeze and Thaw Layers in a Viewport
To turn layers off in a viewport, you need to be on a Layout Tab and in Model Space of a viewport. In the viewport, then move your cursor to the layer droplist and select the layer you want off and hit the "Freeze in Viewport" icon (in red box) for that layer, then click on the drawing area. You can also do this directly from the Layers Dialog. Note that the kitchen fixtures likes the stove are frozen (not visible) in the large viewport, but are thawed (visible) in the smaller viewport that shows the kitchen detail.
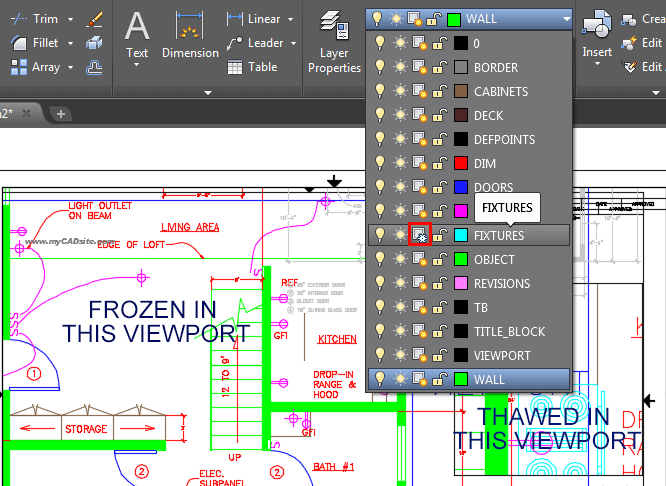
To reverse this, use the same process which will "Thaw" the layer in that viewport.
Video: Layouts / Paper Space in AutoCAD
Extra Practice: If you are feeling ambitious, check out this PDF file that shows a complete plan for a shed. See if you can reproduce the plan and details into a set of drawings. Save the drawing when you are done to use in the next level, so that you can make a 3D model of the shed.
Review: The ability to use layouts successfully leads to well organized drawings and print sets. From there, you can put together sheet sets for distributing to other people. When it comes to plotting 3D drawings, Layouts are essential to capture the views you need and put them on paper. It may take some time to master the concept and procedures, but the results will be well worth it.
You Scored:

Fun fact: Michael Riddle sold AutoCAD to Walker for a dollar, plus 10% of the profit from the sales. At the time that seemed like a reasonable deal to both men. Autodesk's sales grew to over $100,000,000 by 1989 after only four years in operation as a company. Riddle eventually sold his royalty rights to Autodesk for $11,875,000 in January 1992

- To cover this months server costs
- Exceeding amounts will go to creating new content
- Even a penny will help
Did you like the lesson? ❤️
