3D Wireframe Models in AutoCAD
- Lesson 3-1INTRODUCTION TO 3-D (Terminology)
- Lesson 3-2ISOMETRIC DRAWING IN AUTOCAD
- Lesson 3-3WORKING IN 3 DIMENSIONS (X,Y,Z Axes, 3D Rotation)
- Lesson 3-4VIEWING 3-D OBJECTS (Perspective Views, 3D Orbit, DView)
- Lesson 3-5BASIC WIREFRAME MODELS
- Lesson 3-6LINE THICKNESS
- Lesson 3-7REGIONS AND 3-D FACES AND EXTRUDING
- Lesson 3-7aMORE ABOUT EXTRUDING & LOFTING
- Lesson 3-8REVOLVED OBJECTS - REVSURF AND REVOLVE
- Lesson 3-9ADDING MATERIALS IN AUTOCAD
- Lesson 3-10PRIMITIVE SOLIDS
- Lesson 3-11BOOLEAN OPERATIONS AND 3D EDITING
- Lesson 3-12CHANGING FROM THE WCS TO THE UCS
- Lesson 3-13MAPPING MATERIALS
- Lesson 3-14CREATING NEW MATERIALS
- Lesson 3-15EXTRA PROJECTS AND A TUTORIAL
- Lesson 3-16PUTTING IT ALL TOGETHER - MODEL A BUILDING
- Lesson 3-17INTRODUCTION TO RENDERING AND LIGHTING IN AUTOCAD
- Lesson 3-18CREATING ANIMATIONS IN AUTOCAD
- QUIZ FOR LEVEL 3 - 84 QUESTIONS
Topics covered in this Lesson:
3D Wireframe Techniques
Wireframe models are the simplest form of true 3D drawings. They can be used for conversion to other programs or other simple uses. Still, this is not a common way of drawing in 3D these days as the models are easily modified or have (digital) mass.
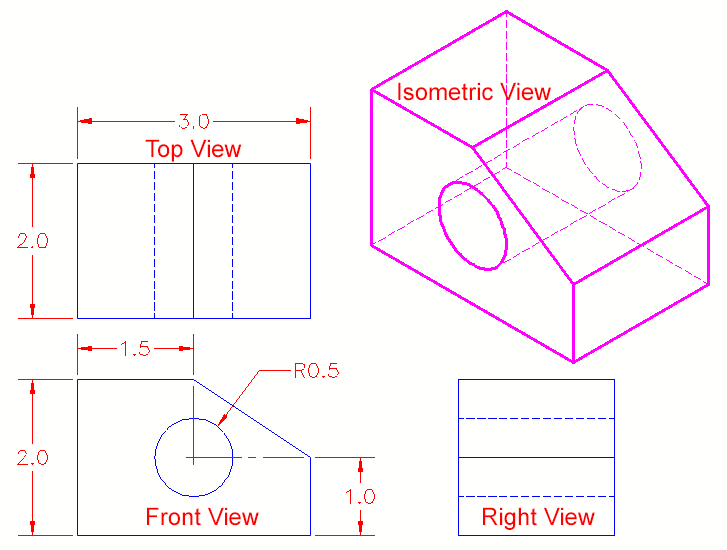
In this lesson, you will be drawing two objects. First, you will draw the shape from the isometric exercise using the same LINE command that you have always used. Then you will draw a simple chair using the same method. This exercise is good practice to work on the XYZ coordinate system.
Start a new drawing using the acad.dwt template.

Create a layer called OBJECT and give it a green color. Make this your current layer.
Using the line command, draw the outline of the front view placing the bottom left corner at 0,0,0 Then draw the circle.
Copy the outline and circle 2" up in the Z-axis. When asked for the base point, select anywhere on the screen, and copy it relative to the base-point: @0,0,2 (X,Y,Z)
Command: CO COPY
Select objects: <SELCT YOUR OBJECTS> 2 found
Select objects: <ENTER>
Current settings: Copy mode = Multiple
Specify base point or [Displacement/mOde] <Displacement>: <PICK>
Specify second point or [Array] <use first point as displacement>: @0,0,2
Specify second point or [Array/Exit/Undo] <Exit>: <ENTER>
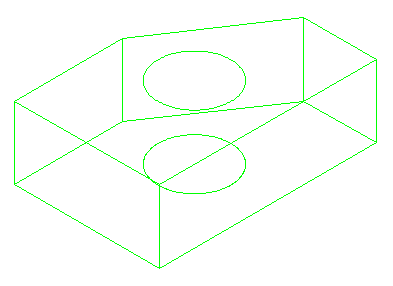
Switch your view to the SW Isometric view. Notice that you have the front and the back drawn now. Using your endpoint Osnap, connect the corners of the object.
Your finished drawing should look like this:

Pick any line and snap to an endpoint grip. Look at the coordinate display on the left of your status bar and see if it makes sense to you. Try this at other points. What you have just done is created a simple object in 3D drawing space. It has length, depth and height. Get used to looking at it, and review what you did to create it.
Use the 3DORBIT command to spin you view and how it looks from different angles.
Save your drawing under the name wireframe1.dwg.
Exercise 2
Start a new drawing using the acad.dwt template.
Create 3 layers called SIDES, SEAT,and BACK and give them different colors. Make back your current layer. Multiple layers make your drawing easier to work with - trust me.
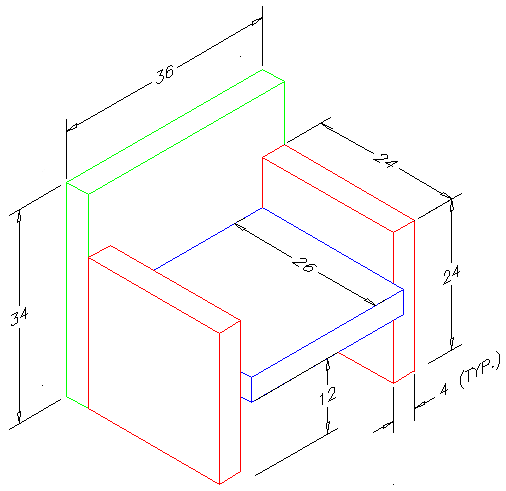
Look at the drawing below. This is the basic chair shape that you will be drawing a few different ways in this course. For this lesson, you'll be using rectangles. Switch to your SE Isometric view.

Start with the back. Draw a RECTANGLE to define the plan view of the back of the chair. Copy it 34" in the Z-axis and then connect the corners with vertical lines.
Next draw the sides (on the sides layer). Use the same method you used for drawing the back (except copy them up 24")
Once you have drawn one side, you can copy or mirror it to make the other side.
Finish up by drawing the seat. This will take a bit of thought as you have to make it fit between the sides. Start by drawing the rectangle for the seat in the correct location, then move it up 12" so that it is at the correct elevation. After that, copy it up 4" and connect the corners.
Save the file as wirefame2.dwg in your CAD folder.
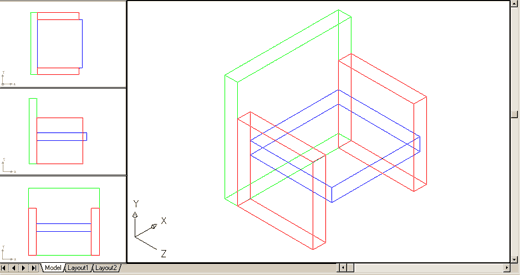
Try to get the viewport configuration you see below using tiled viewports

You don't need to dimension this drawing, but use the Distance command to confirm that the sizes are correct.
When you are sure that your drawing is correct, save it again for later use.
From these simple exercises, you can see that the world of 3D (so far) isn't really different from 2D. You used the same rectangle, line, copy, move commands that you would drawing in a 2D world. The only difference is that you added the Z coordinate to give your point 'height'. Once again, make sure you are familiar with what happened in this lesson before moving on to the next. Redo it if you have to, but get used to the concept of height.
Video: Creating a Wireframe Model
Extra Practice: Create a 3D wireframe model of this drawing.
Extra Practice (B): Create a 3D wireframe model of this drawing.
You Scored:

Fun fact: 2007 - The founder John Walker wrote a diet book, an engineer's approach to dieting called The Hacker's Diet.

- To cover this months server costs
- Exceeding amounts will go to creating new content
- Even a penny will help
Did you like the lesson? ❤️
