Isometic Drafting in AutoCAD
- Lesson 3-1INTRODUCTION TO 3-D (Terminology)
- Lesson 3-2ISOMETRIC DRAWING IN AUTOCAD
- Lesson 3-3WORKING IN 3 DIMENSIONS (X,Y,Z Axes, 3D Rotation)
- Lesson 3-4VIEWING 3-D OBJECTS (Perspective Views, 3D Orbit, DView)
- Lesson 3-5BASIC WIREFRAME MODELS
- Lesson 3-6LINE THICKNESS
- Lesson 3-7REGIONS AND 3-D FACES AND EXTRUDING
- Lesson 3-7aMORE ABOUT EXTRUDING & LOFTING
- Lesson 3-8REVOLVED OBJECTS - REVSURF AND REVOLVE
- Lesson 3-9ADDING MATERIALS IN AUTOCAD
- Lesson 3-10PRIMITIVE SOLIDS
- Lesson 3-11BOOLEAN OPERATIONS AND 3D EDITING
- Lesson 3-12CHANGING FROM THE WCS TO THE UCS
- Lesson 3-13MAPPING MATERIALS
- Lesson 3-14CREATING NEW MATERIALS
- Lesson 3-15EXTRA PROJECTS AND A TUTORIAL
- Lesson 3-16PUTTING IT ALL TOGETHER - MODEL A BUILDING
- Lesson 3-17INTRODUCTION TO RENDERING AND LIGHTING IN AUTOCAD
- Lesson 3-18CREATING ANIMATIONS IN AUTOCAD
- QUIZ FOR LEVEL 3 - 84 QUESTIONS
Topics covered in this Lesson:
Isometric Drafting Techniques
Isometic Drawing
Using Isometric commands is one of the simplest ways to give a 3-D representation while using only 2-D commands. This has been the usual way of doing things before CAD allowed true 3-D work to be done. Many times an isometric drawing is used to compliment or give more information to a 3 view orthographic drawing. See the sample below.

You can see that it is a very simple drawing. This basic isometric drawing of the object gives a very good idea of what it looks like. If this is all that is needed then isometric works well. Unfortunately, as soon as you change anything, like the block's height, you'll need to redraw all four views.
AutoCAD has a command called ISOPLANE which allows you to easily draw at a 30 degree angle as needed for an isometric drawing. You can switch between the three 'isoplanes' (top, right, left) by using this command or by pressing the F5 key.
Command: ISOPLANE <ENTER>
Current isoplane: Right
Enter isometric plane setting [Left/Top/Right] <Left>: T <ENTER>
Current isoplane: Top
Newer versions of AutoCAD have an Isoplane icon on the status bar. You can click this to enter Isometric Drafting Mode as shown below. You can also change your Isoplanes here (but F5 is faster).
By invoking this command, AutoCAD is now set to draw on the top isoplane by default. Your other choices would be Left or Right. Your first exercise will be to draw the object shown above using isometric methods.
Exercise 1 - Isometric Drafting
Begin a new drawing using the acad.dwt template
Create a layer called OBJECT and give it a green color. Make this your current layer.
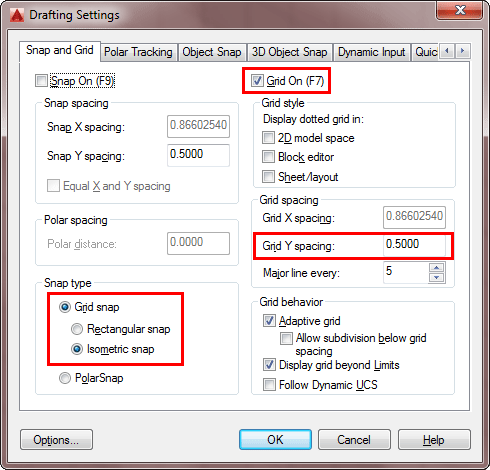
Type in DDRMODES to bring up the Drawing Aids dialog box. Make your settings the same as what you see below (just turn on Isometric Snap).

Remember this dialog box for later. When you are done with Isometric Drafting, open this dialog box again and change the radio button from "Isometric snap" to "Rectangular snap" to get back to the regular drawing settings.
Press OK and you'll see that the grid is set up for isometric drawing for the left isoplane in 1/2 unit increments. Your crosshairs are now angled to show you which isoplane you are currently on and the Grid is laid out differently from what you may be used to.
Begin by drawing the left side of the box (shown at the top of the lesson) using the line command. Ignore the hole at this point. You will want to use the Direct Distance Entry System for this exercise and make sure that you have Ortho ( F8) and Osnaps ( F3) turned on.
Switch to your right isoplane ( F5) and draw the right side.
Switch to your top isoplane ( F5) and draw the top view.
Create the angle lines to add the angled surface.
Switch back to the left isoplane and start the ELLIPSE command. At the command prompt, press I for isocircle. This will allow you to create an ellipse at the correct angle based on the radius of the circle in the orthographic drawing. Use the Osnap to pick the correct center point.
Save your drawing in your CAD folder. (You have a CAD Folder by now, right?)
To dimension an isometric drawing, you have to do a few things first. Create a text style called Left, and give it a 30 o obliquing angle, then create another called right with a -30 o obliquing angle. Then create a new dimension style that has the text aligned with the dimension line. After you have placed a dimension, use the DIMEDIT command to change the obliquing angle of the dimension + or - 30 degrees. You may also need to use the properties to change the text in the dimension to left or right depending upon the orientation of the dimension.
Keep in mind that this is still only 2D. Remember that in some instances, it may be quicker and easier to use this method rather than the more complex 3-D methods you'll be learning in the following lessons.
Extra Practice: Copy this drawing using isometric drawing methods.
Extra Practice: Copy this drawing using isometric drawing methods. If you want to add the hidden lines, jump ahead to Lesson 4-3 to learn about linetypes.
Video: Isometric Drafting
You Scored:

Fun fact: Autodesk, like many other software companies, was challenged by the effects of software piracy in the early 1990s. The company has prevailed in litigation to protect its copyrights, including a 1994 suit against Cadisys Corporation, the result of which was a $100,000 settlement in Autodesk's favor on May 23, 1994.

- To cover this months server costs
- Exceeding amounts will go to creating new content
- Even a penny will help
Did you like the lesson? ❤️
