Editing with Grips in AutoCAD
- Lesson 4-1AUTOCAD TEMPLATE FILES
- Lesson 4-2USING OSNAPS IN AUTOCAD
- Lesson 4-3LINETYPES AND LINETYPE SCALE
- Lesson 4-4AUTOCAD FILE FORMATS
- Lesson 4-5GRIP EDITING / DIVIDE COMMAND
- Lesson 4-6AUTOCAD'S INQUIRY TOOLS
- Lesson 4-7XREF'S (EXTERNAL REFERENCES)
- Lesson 4-8SYSTEM VARIABLES IN AUTOCAD
- Lesson 4-9TABLES
- Lesson 4-10CREATING AND PUBLISHING SET SHEETS
- Lesson 4-11MODIFYING AND CREATING DIMENSIONS
- Lesson 4-11aDIFFERENT TYPES OF DIMENSIONS
- Lesson 4-12INTRODUCTION TO CUSTOMIZING AUTOCAD
- QUIZ FOR LEVEL 4 - 67 QUESTIONS
Topics covered in this Lesson:
Working with Grips | Points/Nodes
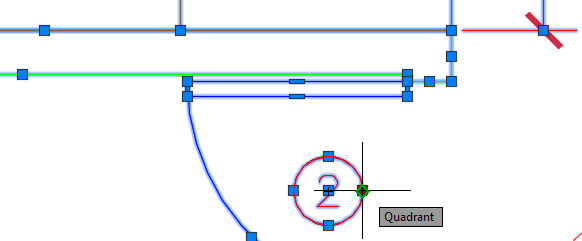
By now you should be familiar with grips. These are the ‘blue squares' that get highlighted when you select an object outside of a command.

Grips are handles that allow you to manipulate the object without entering a command directly. Be aware that grip editing can lead to undesired results if you are not careful.
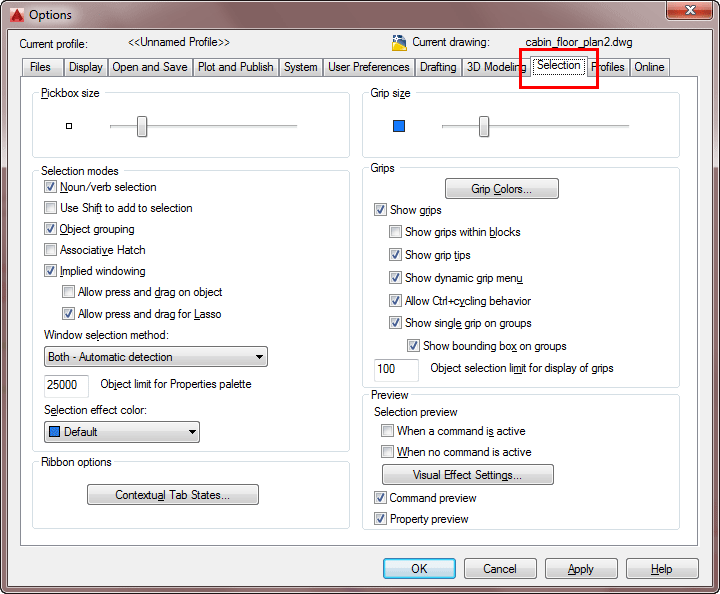
Usually these settings do not need to be changed, but the look of your grips can be modified by entering the DDGRIPS command. You'll see this dialog box (it's the Options dialog box: Selection tab):

Notice that you can enable or disable grips, as well as control whether they are enabled within blocks or not. The default settings should work for most situations.
You can change the colors so that they are more visible depending on the particular drawing or background color you are working in. You can also change the size of the grip if you need.
Notice that there are two different colors for grips, one when they are unselected (but visible) and another color when they are selected, or hot.
When you first start working with grip editing, I recommend that you use it for modifying your dimensions. This is an easy way to get started, as it won't affect your geometry. Once you have mastered grip editing with dimensions, try editing your geometry and you'll find that in many cases this can be quicker and easier than using the regular AutoCAD commands.
When you first select a grip and make it hot, it turns red and you are able to stretch it to where you need it to go. Always read your command line when grip editing.
Command: <select an object>
** STRETCH **
<Stretch to point>/Base point/Copy/Undo/eXit:
You'll see that there are few options, ignore these for now and try the stretch option. You can now move that point anywhere and snap to any Osnap that you have active. This can be a quick easy way to connect lines rather than extend them. Once you have made your modification, press the escape key to deselect the grips. (Pressing the enter key will repeat the last command, which you don't want to do). You may have to press escape a few times to totally deselect the object.
The stretch option is only the first of several commands that you have available for grip editing. By pressing the space bar , you will be able to cycle through all available options for grip editing.
Command: <Pick and Object and Select a Grip>
** STRETCH **
Specify stretch point or [Base point/Copy/Undo/eXit]: <space>** MOVE **
Specify move point or [Base point/Copy/Undo/eXit]:<space>** ROTATE **
Specify rotation angle or [Base point/Copy/Undo/Reference/eXit]: <space>** SCALE **
Specify scale factor or [Base point/Copy/Undo/Reference/eXit]: <space>** MIRROR **
Specify second point or [Base point/Copy/Undo/eXit]:
The previous lines of text show what the command line would look like as you cycle through the options.
To use any of these options, you should be very comfortable using the regular commands first.
You'll notice that these other options work a bit differently than the stretch option. If you have many objects selected, you can stretch one point, but can move all the objects highlighted with grip editing. This applies to the rotate, scale and mirror options as well.
Different objects have different grips available to them. A line has 3 grips: 2 endpoints and a midpoint. You can stretch the endpoints, but if you ‘stretch' the midpoint, you move the line. You can stretch quadrants of a circle to change the radius, but stretching the center grip will move the circle. Single line text has one or two grips depending on the justification used. You can use their grips to align the text.
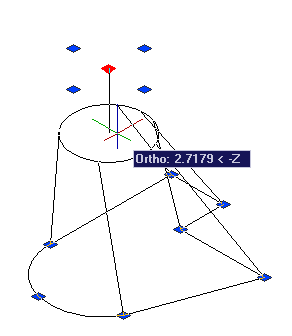
You can also use grips to adjust points in 3D objects. Just like a 2D object, select the solid with no commands are currently running and the grips will appear. You can then stretch grips to new points, giving you more power when editing solids.
In the example below the Center grip was used to shorten the 3D solid.

Working with Nodes and Points
One last area to cover is the function and display of points, or nodes. If you have used the divide command, you have worked with the Node Osnaps. First make sure your Node Osnap is turned on. If you haven't, just draw a line and then enter the DIVIDE command.
Command: DIV
DIVIDE
Select object to divide: <Select the line>
Enter the number of segments or [Block]: 3
With default Point Style settings, it will look like nothing has changed. But if you start the LINE command again, you'll see that 2 more Osnaps have been added.

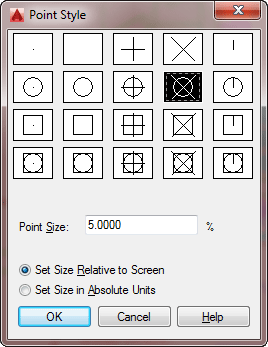
If you divide a line and add 2 nodes, it's fairly easy to find then. If you divide a line into 20 segments, you'll start having some trouble locating them. Lucky for you, AutoCAD has a way of changing the display of your node Osnap. To do this, use the DDPTYPE command.

This is an easy dialog box to figure out. The first section allows you to select what you want your point to look like. I usually select the fourth one in second row as it is very easy to see, but you can select whichever one you want. Try a few out.

The next section defines what size the point will be.
Leave the value of 5 for now and look and the radio button options. The default, "Set Size Relative to Screen" will make the point appear 5% of your display. This makes it very easy to find in any drawing. The drawback is that if you have drawing with a lot points, the screen gets very cluttered. Use this setting in smaller drawings, or if you have few points. If you choose this setting, zoom out and then refresh the screen (RE) to see how they stay the same size.
The second choice is "Set Size in Absolute Units". This keeps the points at the same size consistently. If you zoom and refresh, the point size stays relative to your other drawing objects and not the screen. Use this if you have a lot of nodes or points in your drawing.
The divide command is very handy, and I recommend that once you have divided the object and made your edits, erase the nodes. Having extra nodes on a line can confuse you (or anyone else working on the drawing) at a later point.
Conclusion: In review, if you can master grips, you will be able to be much quicker at editing your drawing. I use grip edits a LOT in my drafting and it saves me a ton of time. Practice this technique until it becomes second nature to you and you'll be happier for the experience.
Video: Grips & Divide / Nodes
You Scored:

Fun fact: There are thousands of AutoCAD commands. The most used Erase, followed by Move and Undo.

- To cover this months server costs
- Exceeding amounts will go to creating new content
- Even a penny will help
Did you like the lesson? ❤️
